SimLab Help
Quick Start
Open the Lab Report Screen
To create a simulated lab report, the first step is to navigate to the Lab Report page. This can be down by either selecting the Lab Report link from the top bar (option 1), or the Start a Lab Report button from the front page (option 2).
Option 1: 
Option 2: 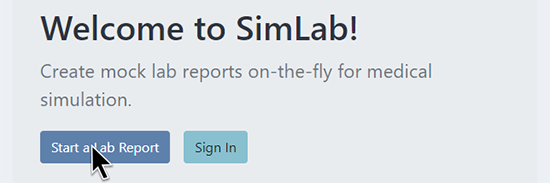
Modify the Report Settings
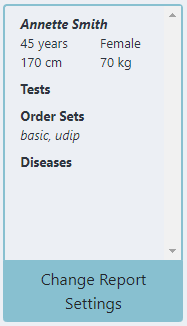
SimLab will start you off with a default lab report for a 45 year old female patient named Annette Smith (her MRN is the very creative 1234-567-890). She is 170cm tall and weighs 70kg. She has no medical illness, and we have a lab report for her consisting of the Basic order set and a urine dip. This is all shown in the settings box:
It's also a very boring sim patient: lets change some settings by clicking the light blue (cerulean?) Change Report Settings button at the bottom of the settings box. This will open the settings window, and which allows you to modify the Patient settings, the Tests settings, and the Diseases settings, selectable by the tabs at the top left of the settings window.

Let's start by changing some patient demographics. Let's change the patient's name to 'Tom Hanks', and the patient's age to 54 (he looks so young that we'll give him a bonus decade). Next, click on the Tests tab, and type 'Ketone', and select 'Urinalysis POC Ketones' from the list. Next, select 'Arterial Blood Gas' from the Order Sets section.
Finally, click on the Diseases tab at the top left, and select 'Diabetic Ketoacidosis'.
After selecting these tests, order sets, and diseases, click Save Changes to save the new settings and close the settings window.
You will note that nothing has changed! In order to avoid overwriting previous work, SimLab will not overwrite a lab report unless explicitly told to. The Generate New Report button is now pulsating, indicating that there are new settings that have not yet been applied. Click on it now to generate a new lab report with your new settings:

Modify a Lab Report Value
Not all lab results are created equal! In SimLab, some lab results are generated as normally-distributed, independent lab values, while others are derived from a combination of other lab values. Derived values are indicated with a  icon. Lab results lacking that icon are normally-distributed.
Modify a Normally-Distributed Lab Report Value
If you update the lab result that a derived lab result depends on, the derived value will also update, unless locked. Let's try this out:
- Click on the result (the number) for hemoglobin, it should open and allow text to be selected:

- Change the value to '40', and press <Enter>. The hemoglobin value will update, but so will the hematocrit (to about 0.12).
- This time, we'll lock the hematocrit value. Click on the lock icon at the right end of the hematocrit result line:

- Again click on the result for hemoglobin, and this time change it to 200. You will notice that the hematocrit does not change. It can be unlocked by clicking on the lock icon again.
Modify a Derived Lab Report Value
The hematocrit value, despite being a derived value, can also be edited directly, and the derived value overridden. To do this, use the same process as changing the hemoglobin, except click on the hematocrit result and modify it. Notice that the hemoglobin value does not update! Currently, derived results will not update the results that they depend on (this is a feature that will be added in the future).
Print the Lab Report
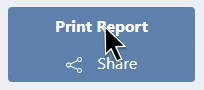
Finally, a lab report can be turned into a PDF or a paper-based lab report by printing it. Select the Print Report button on the right-sided command bar:
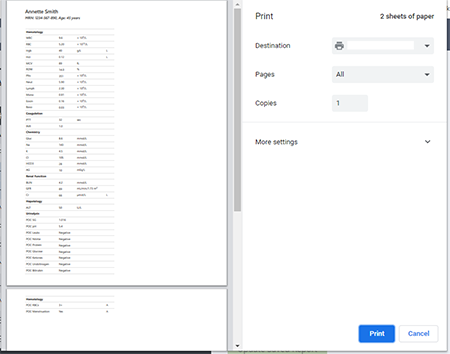
This will open the print dialog and show a preview of the lab report, with all of the editing options, toolbars, and icons removed.
That's it! Go forth and simulate some cases!